
The steps below detail the process for editing (adding/removing) the animation targets for a character. An animation target is an attribute for which keyframe data is generated. This may be:
-
weights on blendshape nodes
-
translation, rotation, or scale attributes on joints or any other transform nodes
-
custom attributes on any node
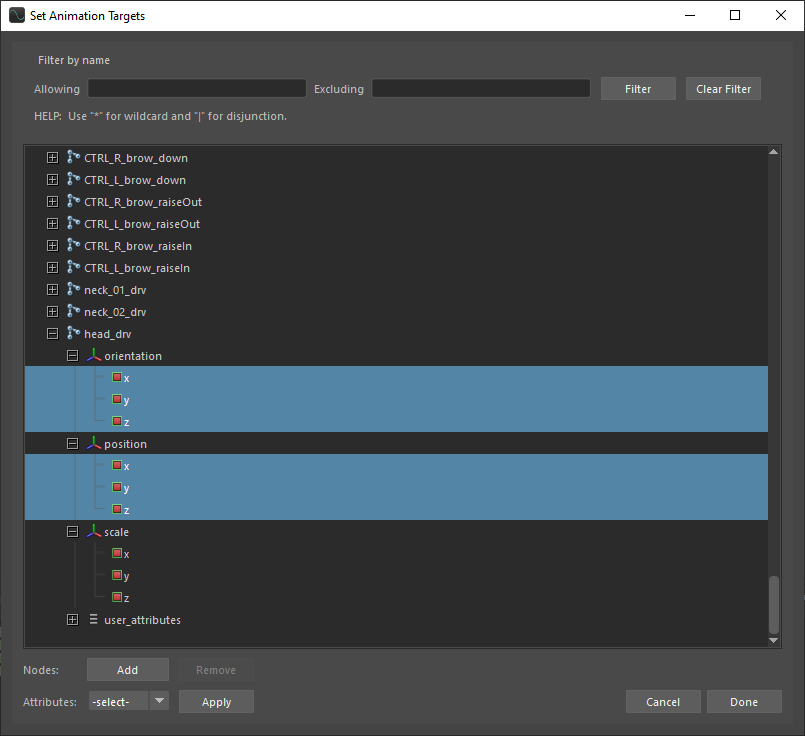
With the correct Maya scene and Character Control File loaded, click Edit > Set animation targets. This will open a window where you can see the list of existing animation targets.

Beside each channel name is a small box. For attributes that are being driven by SGX, the box will display blue. For those that are not, the box will display red. The filter at the top of the window can be used to search for specific attributes.
Animation targets are selected in two stages:
-
Add objects to the scene to the object list.
-
Select attributes of those objects to serve as targets.
Adding and removing objects
To add objects to the object list:
-
Select one or more objects in the Maya Outliner or Viewport.
-
Click Add.

Once added, the objects will appear in the target list.
To remove objects from the object list:
-
Select one or more objects in the object list.
-
Click Remove.

The removed objects should immediately disappear from the list.
Setting attribute status
After adding an object to the object list, its attributes are not automatically animation targets. This depends on the status you assign to each attribute. Attributes may be set to either free, meaning they are free variables controlled by SGX, or constant, meaning they have constant values that cannot be altered by SGX.
In order to change the status of an attribute:
-
Navigate to the object and select the channels that you want to edit the status of.
-
In order to include the selected attributes as animation targets, set the Attributes dropdown to FREE and click Apply. The selected attributes will now be marked in blue.

On the other hand, in order to exclude the selected attributes from the animation targets, set the Attributes dropodwn to CONST, and click Apply. The selected attributes will now be marked in red.

Note that it is possible to edit attribute states by selecting one or more objects in the list rather than selecting the attributes directly. The changes will apply to all attributes of the selected objects that are not excluded by the filter.
Finishing editing
When you are finished editing the animation targets, hit Done to make the changes permanent, or Cancel to discard the changes.
When adding or removing animation targets, pay close attention to any changes in the neutral pose. It may need to be reset depending on which targets were added or removed.
Baked animation level
To switch between animation levels, use the dropdown at the top of the plugin UI:
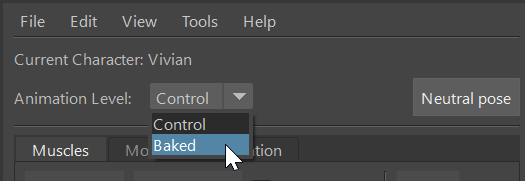
In order to define the baked level, first choose the animation targets of that level. Do this by switching to the baked level and then click Edit > Set animation targets, following the instructions above for setting the targets.
Once the animation targets are defined, you may bake the muscles by simply clicking Edit > Bake muscles. The baked level is then fully defined.
Whenever any changes have been made to the muscles or neutral pose at the control level, you must re-bake the muscles (by calling Edit > Bake muscles again) for the changes to take effect on the baked level. But note that any manual edits you may have made to the muscles while on the baked level will be overwritten by the re-baking.