
A user-friendly way to access SGX functionality is through the graphical interface SGX-GUI, which you can use to generate and run SGX commands.
You may launch SGX-GUI by running sgx-gui.exe or by clicking SGX in the start menu:

UI Map
SGX-GUI provides various fields for setting up a batch process. Only the fields marked with an asterisk are required fields; the rest are optional.
These fields may be grouped into five sections: Inputs/Outputs, Resources, Time Settings, Batch Markup, and Command Line Display & Run.

Section 1 - Inputs/Outputs
.jpg?cb=be2a6d38ff11e8993fca758740105511)
Input
Specify the location of your audio and transcript files, or alternatively your batch processing list file. To change from directory processing to list-based processing click the dropdown menu and select "List".
Batch Transcript File (optional)
Specify the location of the batch transcript file, if you are using one.
Output Directory (optional)
Specify the location of the directory where SGX should save the output animation files and batch report. This is optional; if no output directory is specified, the output files are saved to a default directory, output\, within your input directory.
However, note that if the input is provided as a list of files rather than as a directory (see File List Input), specifying the output directory is required, not optional.

Extract Animation
By checking this option SGX will output the animation data in plain-text .rts files in addition to the .event files.
Force Overwrite
This option will cause SGX to overwrite the animation files that might be in the output folder from previous processing jobs.
Non-deterministic Output
Normal SGX processing will yield the same output for the same input on multiple repetitions of the same processing command. But when the non-deterministic option is used, some aspects of the animation will turn out differently each time, including nonverbal expression selections, blinks, and microdarts.
Section 2 - Resources

Resources Directory
Define the path to the SGX Resources folder, which contains subfolders for characters and languages. Once the resources folder is selected, available language and character names will populate the dropdown menus.
Language (optional)
Select the language module for the language heard in the batch audio. The selection of language is optional; if no language is specified, transcripts will not be used. But since transcripts help the analysis achieve the best quality level, using transcripts is encouraged.
It's important to chose the correct language, or there will be little benefit. In cases where SGX provides a choice between dialects, such as American vs British English, identifying the right dialect will give you the best results. If in doubt about the dialect, use what sounds closest (e.g., for an Australian accent, use British English).
Character
Select the character definition file for the character you want to animate.
Section 3 - Time Settings

The options in this section allow you to customize the transitions into and out of the animations generated by SGX.
Pre-roll and Post-roll
By default, each output animation has the same duration as the input audio file. But if the audio file has no padding of silence at the beginning or end, then the animation might start or end with the face in an active state, since there will be no time for transitions. If you want the animation to start or end in a neutral state, use pre-roll and post-roll.
If the pre-roll option is used, some time will be added to the beginning of the animation to make time for the transition into speech; likewise, if post-roll is used, some time will be added to the end to make time for the muscles to resolve to neutral. There are three options for pre-roll and post-roll:
-
None - No time added.
-
Auto - Automatically calculates the amount of time needed to transition from neutral pose to animation (pre-roll), and from animation to neutral pose (post-roll).
-
Fixed - Add custom values in milliseconds.
For each audio file, the pre-roll and post-roll durations will be reported in the batch report (see Output Format). Audio playback should be offset from the animation by the duration of the pre-roll.
Neutral Finish
By default, each animation ends with the last nonverbal expression. If you want all muscles to return to neutral, check the "Neutral Finish" box. Note, this does not guarantee that there is enough time at the end to see the return to neutral; for that, use post-roll.
Section 4 - Batch Markup
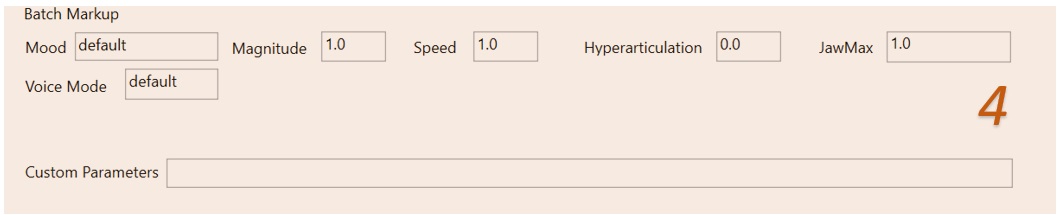
This section allows you to set global markup values for the entire batch. Note that these settings will only serve as default values; markup values within the text transcripts will take precedence over these global settings.
-
Mood - Specify the mood by name. To invoke automatic mood detection enter "auto".
-
Magnitude - Specify the magnitude of the animation.
-
Speed - Specify the speed of the animation.
-
Hyperarticulation - Specify the hyperarticulation of the animation.
-
JawMax - Restrict the maximum opening of the jaw.
-
Voice Mode - Engage automatic voice mode with "auto". For normal speech use "default".
This section also has a "Custom Parameters" field, which should be used as directed by Speech Graphics support.
Section 5 - Command Line Display & Run

In this section there are controls for running the batch or printing the command for use on the command line. There are three buttons:
-
Reset Defaults - Clear all input from the GUI and restore the default settings.
-
Print Command - Print the command so that you can copy and paste it into a command line.
-
Run - Press this when all the batch parameters are specified. This will launch processing in a terminal window, which will show processing status and list failed items. Output will accumulate in the output folder.
