
Inspector
The properties of the current event and its constituent sequences are shown in the Inspector tab (see Tabs).
The properties are divided into two parts:
-
Event properties (top): The properties of the currently selected event
-
Sequence properties (bottom): The properties of the currently selected sequence (see Sequence selection)
The sequence properties differ depending on the type of the selected sequence.
Event properties
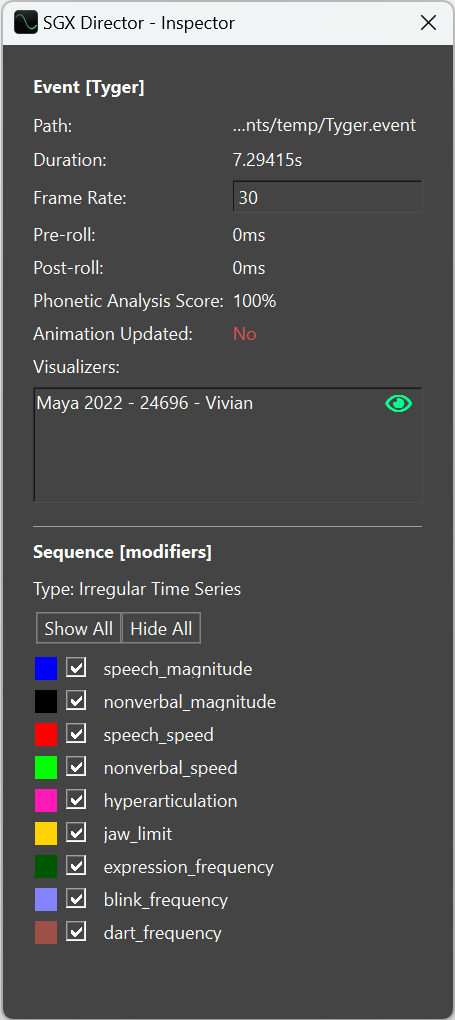
The Event section includes the name of the event, and the following properties:
|
Property |
Description |
|
Path |
The path of the event on disk. If partially shown, hover on the path to see the full path. |
|
Duration |
The duration of the event in seconds. This is equivalent to the duration of the audio track, plus any added pre-roll and post-roll. |
|
Frame Rate |
The frame rate of the event, which determines the frame rate of keyframe animation exported from the event (frames per second). |
|
Pre-roll |
The pre-roll that was added during processing. |
|
Post-roll |
The post-roll that was added during processing. |
|
Phonetic Anlaysis Score |
The percentage of the event timeline during which the phonetic lip sync analysis was deemed correct and was therefore used (see Phonetic and Acoustic lip sync processing). |
|
Animation Updated |
Whether the animation in the current event is up to date with any edits made to metadata. If Yes, nothing needs to be done. If No, the event requires processing. |
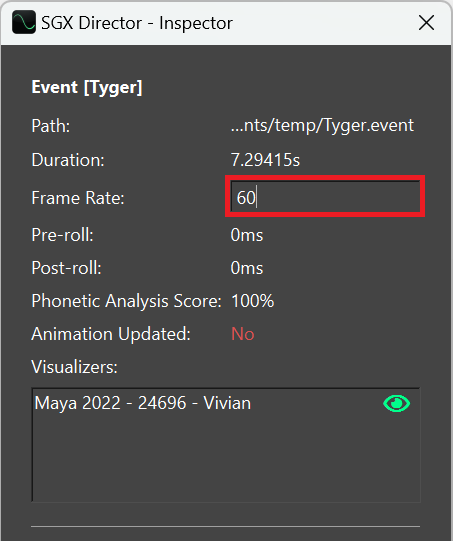
The Frame Rate of the event, which is set during processing based on the processing configuration (see Processing settings), can be changed in the Inspector by typing in a new value:
The Event properties section also contains a list of Visualizers. These are instances of SGX Studio on the local machine that are available for binding to the current event for the purpose of visualizing animation. See Playing Events for more information.
Sequence selection
Clicking anywhere in a sequence selects that sequence. The currently selected sequence has its title text highlighted in green:

The properties of the selected sequence are displayed in the Sequence section of the Inspector tab.
Sequence visibility controls
The title bar of each sequence contains controls for deleting, minimizing/expanding, maximizing, and pinning the sequence.
.png?cb=a6b2cd576c5f47eaacbcaee3a7e83283)
Minimizing a sequence hides the content and retains only the title bar. Expanding it shows the content again. Maximizing a sequence minimizes all sequences other than this one.
The menu item View > Event > Collapse Event minimizes all sequences in the event, and the menu item View > Event > Expand Event expands all sequences in the event.
Pinning a sequence attaches a view of it to the top of the event editor where it remains fixed during scrolling. A sequence may be unpinned by clicking the pin icon again.
Additional sequences
By default, not all available sequences of an event are displayed in the event editor – only the ones most commonly used for editing. See Display settings for options to show:
Time selection
The event editor enables selection of intervals and time points on the timeline. Selection is useful for:
-
Playback of sub-intervals. Selecting an interval divides the playbar into sub-intervals: the interval before the selection, the selected interval, and the interval after the selection (see Playback controls). These sub-intervals of the play bar are helpful for isolating segments of animation during editing.
-
Editing of metadata. Selection of intervals and points on the timeline guides the placement of new segments or boundaries into metadata. See Editing Events.
Selecting time in a continuous time series
If you click inside any continuous time series sequence (Audio, Regular Time Series or Irregular Time Series), you can select:
-
a time point (single click)
-
an interval (click and drag)
These are both illustrated in the video below.
Selecting time in a Categorical Time Series
If you click inside a Categorical Time Series, the effects are different:
-
Clicking on a boundary selects the time point of that boundary.
-
Clicking inside a segment selects the interval of that segment.
See Boundary and segment selection for more information and examples.
Time zoom
There are four zoom controls in the lower right corner of the event editor:

These represent four zoom functions, which can also be accessed in other ways as described in this table:
|
Zoom function |
Button |
Menu item |
Keyboard shortcuts |
|
Zoom in |

|
View > Event > Zoom In |
Ctrl++ Ctrl+wheel scroll |
|
Zoom out |

|
View > Event > Zoom Out |
Ctrl+- Ctrl+wheel scroll |
|
Zoom selection |

|
View > Event > Zoom Selection |
|
|
Zoom all |

|
View > Event > Zoom All |
|
Use zoom in and zoom out to reduce or expand the visible interval around the current center. The zoom selection function frames the currently selected interval. The zoom all function frames the entire event timeline.
Vertical zoom
You can also zoom the event in the vertical dimension using Shift+wheel scroll. This effectively adjusts the height of all of the sequences in the event.
Sequences that have numerical ranges (Regular Time Series and Irregular Time Series) can also be vertically zoomed by themselves, in order to expand or contract the range. See Range controls.
Scrolling
When the current zoom does not show the entire event horizontally or vertically, scroll bars appear, which can be used to move the viewport horizonally through time or vertically through the sequence stack.
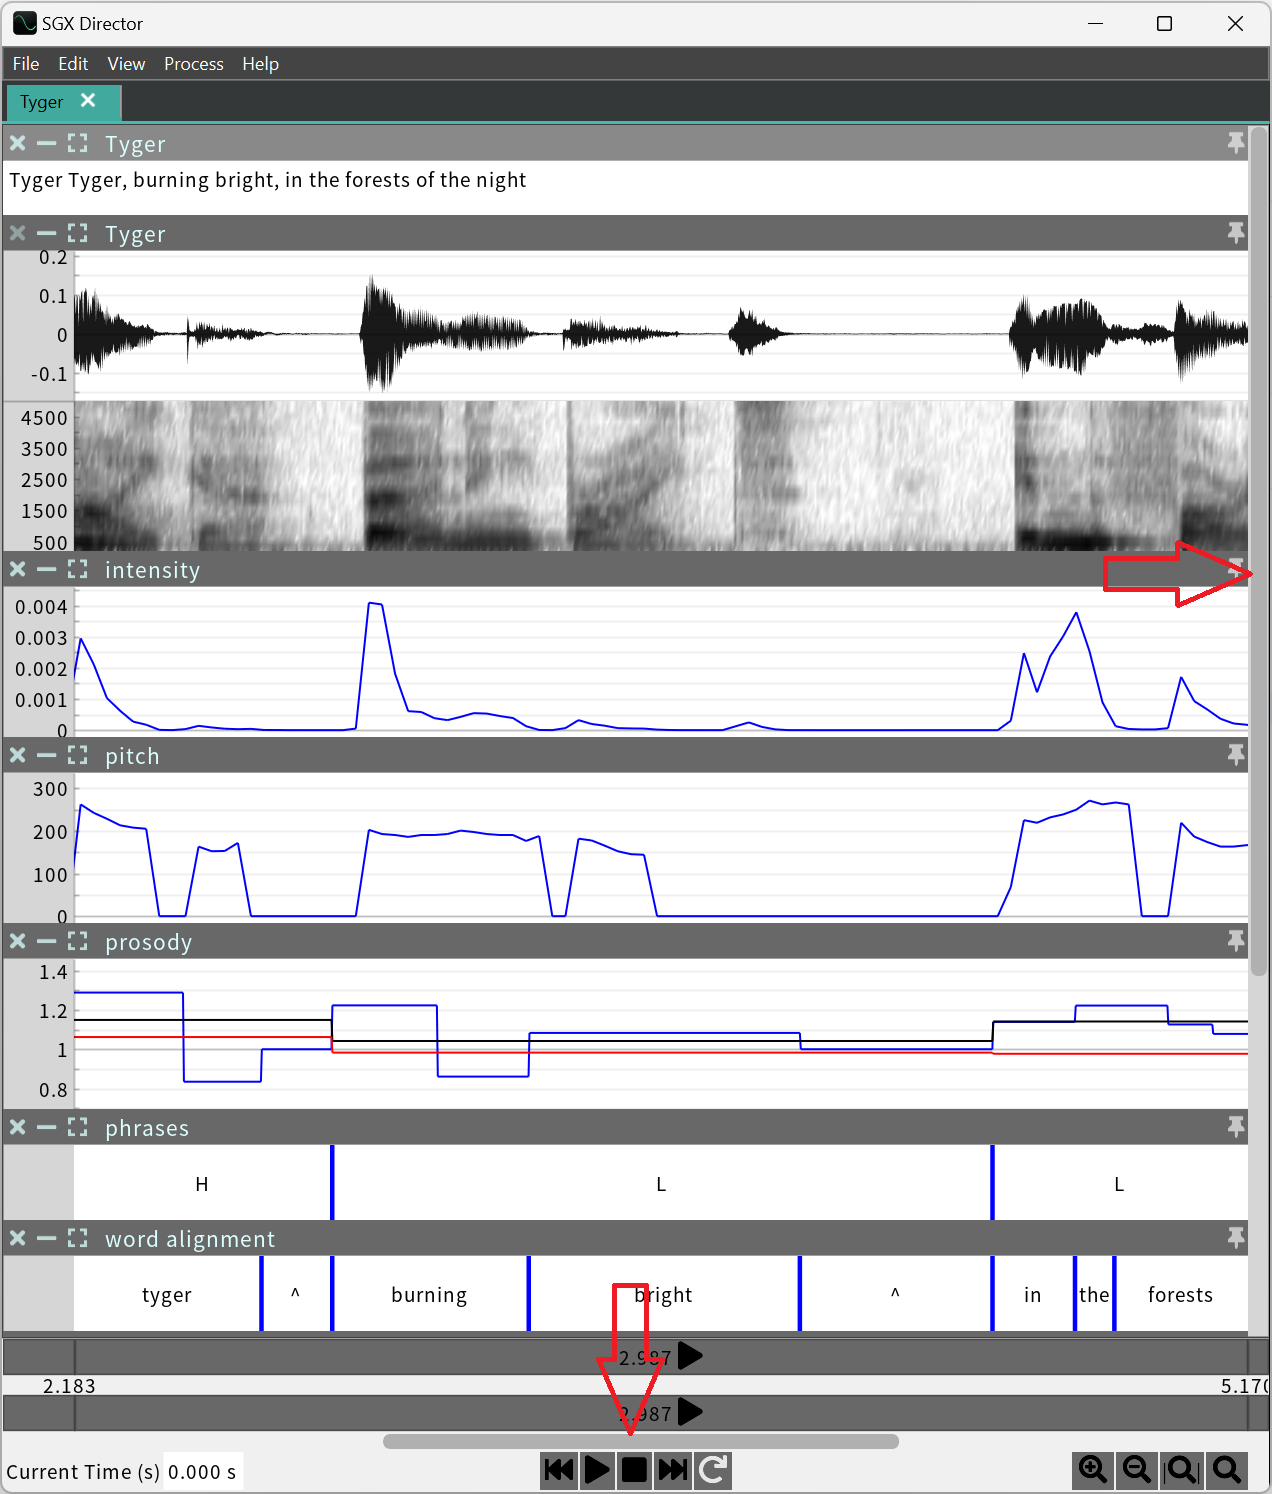
Panning
Similar to scrolling, panning allows you to shift the current view left/right or up/down, but through click-and-drag rather than with scroll bars.
Click and hold either the middle mouse button or Shift+Ctrl+left mouse button inside of any sequence. Dragging horizontally moves the time frame left or right. However, dragging vertically only has an effect within the sequence you’ve clicked in: if that sequence has a numerical range (i.e. is a Regular Time Series and Irregular Time Series), it pans the range up or down (see Range controls).